回顾 在上一篇文章 中,我们探索了从内核触摸事件传递到InputDispatcher线程,再与应用线程之间建立InputChannel的过程,并且我们已经看到一个最原始的触摸事件被封装成一个msg并通过InputChannel建立的socket通过sendMessage()方法跨线程通信发送给了应用的UI线程。
这篇文章将会看到应用UI线程的消息队列是如何读取传递过来的触摸事件并进行处理、分发的。
本篇文章主要参考了Gityuan的文章
消息循环 Android的消息机制的具体内容在只简单描述,详细内容请见:
http://www.viseator.com/2017/10/22/android_event_1/
应用的UI线程拥有消息队列与一个Looper,应用初始化的过程中会调用Looper的loop()方法来启动一个无限循环来不断读取、处理队列中的消息,Android是一个事件驱动的模型,只有源源不断的事件产生与处理才能推动应用的进行。
同时应该注意的是在Java与Native中各有一套消息处理的流程可以进行消息的处理,而如同触摸事件这种来源于Native层的事件消息,都是通过Native Looper进行处理的。
Looper 当应用初始化时,会调用Looper.prepare():
1
2
3
4
5
6
private static void prepare (boolean quitAllowed) if (sThreadLocal.get() != null ) { throw new RuntimeException("Only one Looper may be created per thread" ); } sThreadLocal.set(new Looper(quitAllowed)); }
会在ThreadLocal区域新建一个Looper对象:
1
2
3
4
private Looper (boolean quitAllowed) mQueue = new MessageQueue(quitAllowed); mThread = Thread.currentThread(); }
同时初始化了一个MessageQueue,保存了当前的线程:
1 2 3 4 MessageQueue(boolean quitAllowed) { mQuitAllowed = quitAllowed; mPtr = nativeInit(); }
nativeInit()方法初始化了native的消息队列:
1
2
3
4
5
6
7
8
9
10
static jlong android_os_MessageQueue_nativeInit (JNIEnv* env, jclass clazz) NativeMessageQueue* nativeMessageQueue = new NativeMessageQueue(); if (!nativeMessageQueue) { jniThrowRuntimeException(env, "Unable to allocate native queue" ); return 0 ; } nativeMessageQueue->incStrong(env); return reinterpret_cast <jlong>(nativeMessageQueue); }
新建了一个NativeMessageQueue:
1
2
3
4
5
6
7
8
NativeMessageQueue::NativeMessageQueue() : mPollEnv(NULL ), mPollObj(NULL ), mExceptionObj(NULL ) { mLooper = Looper::getForThread(); if (mLooper == NULL ) { mLooper = new Looper(false ); Looper::setForThread(mLooper); } }
这里进行的初始化过程与java层的比较类似,都是新建了一个Looper对象存放入了ThreadLocal区域中。
当初始化过程完成之后,系统调用Looper.loop()开始消息循环:
1
2
3
4
5
6
7
8
9
10
11
12
13
14
15
16
17
18
19
20
21
22
23
24
25
public static void loop () final Looper me = myLooper(); ... final MessageQueue queue = me.mQueue; ... for (;;) { Message msg = queue.next(); if (msg == null ) { return ; } ... try { msg.target.dispatchMessage(msg); } finally { if (traceTag != 0 ) { Trace.traceEnd(traceTag); } } ... msg.recycleUnchecked(); } }
省略了大量代码,我们看到在这个无限循环中,首先就调用了MessageQueue的next()方法来获取下一条消息,注意这是一个阻塞调用,在下一条消息还没到时间或者没有下一条消息时候会被阻塞。
1
2
3
4
5
6
7
8
9
10
11
12
13
14
15
16
17
18
19
20
Message next () { final long ptr = mPtr; if (ptr == 0 ) { return null ; } int pendingIdleHandlerCount = -1 ; int nextPollTimeoutMillis = 0 ; for (;;) { if (nextPollTimeoutMillis != 0 ) { Binder.flushPendingCommands(); } nativePollOnce(ptr, nextPollTimeoutMillis); ... } }
这里我们不关心java层后续对事件的处理,而是关心java层是如何调用native层的方法来对native消息队列中的事件进行处理的,因为我们的触摸事件是在native层进行处理再到java层进行分发的。
在next()方法中我们就调用了nativePollOnce()方法先去处理native中的事件:
1
2
3
4
5
static void android_os_MessageQueue_nativePollOnce (JNIEnv* env, jobject obj, jlong ptr, jint timeoutMillis) NativeMessageQueue* nativeMessageQueue = reinterpret_cast <NativeMessageQueue*>(ptr); nativeMessageQueue->pollOnce(env, obj, timeoutMillis); }
调用了nativeMessageQueue的pollOnce()方法:
1
2
3
4
5
6
7
8
9
10
11
12
13
void NativeMessageQueue::pollOnce (JNIEnv* env, jobject pollObj, int timeoutMillis) mPollEnv = env; mPollObj = pollObj; mLooper->pollOnce(timeoutMillis); mPollObj = NULL ; mPollEnv = NULL ; if (mExceptionObj) { env->Throw(mExceptionObj); env->DeleteLocalRef(mExceptionObj); mExceptionObj = NULL ; } }
调用了native Looper的pollOnce()方法:
1
2
3
4
5
6
7
int Looper::pollOnce (int timeoutMillis, int * outFd, int * outEvents, void ** outData) int result = 0 ; for (;;) { ... result = pollInner(timeoutMillis); } }
忽略特殊处理的过程,最终调用了pollInner()方法:(PollInner()的代码比较长,省略了大部分,标记了后面讨论的三个部分)
1
2
3
4
5
6
7
8
9
10
11
12
13
14
15
16
17
18
19
20
21
22
23
24
25
26
27
28
29
30
31
32
33
34
35
36
37
38
39
40
41
42
43
44
45
46
47
48
49
50
51
52
53
54
55
56
57
58
59
60
61
62
63
64
65
66
int Looper::pollInner (int timeoutMillis) ... int result = POLL_WAKE; mResponses.clear(); mResponseIndex = 0 ; mPolling = true ; struct epoll_event eventItems [EPOLL_MAX_EVENTS ]; int eventCount = epoll_wait(mEpollFd, eventItems, EPOLL_MAX_EVENTS, timeoutMillis); ... for (int i = 0 ; i < eventCount; i++) { int fd = eventItems[i].data.fd; uint32_t epollEvents = eventItems[i].events; if (fd == mWakeEventFd) { if (epollEvents & EPOLLIN) { awoken(); } else { ALOGW("Ignoring unexpected epoll events 0x%x on wake event fd." , epollEvents); } } else { ssize_t requestIndex = mRequests.indexOfKey(fd); if (requestIndex >= 0 ) { int events = 0 ; if (epollEvents & EPOLLIN) events |= EVENT_INPUT; if (epollEvents & EPOLLOUT) events |= EVENT_OUTPUT; if (epollEvents & EPOLLERR) events |= EVENT_ERROR; if (epollEvents & EPOLLHUP) events |= EVENT_HANGUP; pushResponse(events, mRequests.valueAt(requestIndex)); } else { ALOGW("Ignoring unexpected epoll events 0x%x on fd %d that is " "no longer registered." , epollEvents, fd); } } } Done: ; ... mLock.unlock(); for (size_t i = 0 ; i < mResponses.size(); i++) { Response& response = mResponses.editItemAt(i); if (response.request.ident == POLL_CALLBACK) { int fd = response.request.fd; int events = response.events; void * data = response.request.data; int callbackResult = response.request.callback->handleEvent(fd, events, data); if (callbackResult == 0 ) { removeFd(fd, response.request.seq); } response.request.callback.clear(); result = POLL_CALLBACK; } } return result; }
第一部分中,调用了epoll_wait()函数等待消息,当接收到消息或者发生超时的时候调用返回。
第二部分对返回的events进行遍历,如果对应的fd为唤醒专用的mWakeEventFd,执行awoken()函数清空管道,这个事件的作用只是为了唤醒Looper对新消息进行处理。
如果不是mWakeEventFd,说明为我们之前通过addFd()函数添加的自定义fd,我们需要对这个event进行处理,处理函数为pushResponse():
1
2
ssize_t requestIndex = mRequests.indexOfKey(fd);pushResponse(events, mRequests.valueAt(requestIndex));
我们还记得在前面addFd()的过程中已经将fd作为索引,向mRequest中保存了request信息,信息中包含了callback也就是NativeInputEventReceiver对象。
1
2
3
4
5
6
void Looper::pushResponse (int events, const Request& request) Response response; response.events = events; response.request = request; mResponses.push(response); }
这里将request对象包装成了一个response,然后存入了mResponses中等待后面的处理。
第三部分中就是对于response的处理过程,主要就是这个调用:
1 int callbackResult = response.request.callback->handleEvent(fd, events, data);
调用了callback的handleEvent(),我们现在知道callback是前面保存的NativeInputEventReceiver对象。
现在,当原始事件通过建立好的InputChannel的sendMessage()函数发送触摸事件时:
1
2
3
4
5
6
7
8
9
10
status_t InputChannel::sendMessage (const InputMessage* msg) size_t msgLength = msg->size(); ssize_t nWrite; do { nWrite = ::send(mFd, msg, msgLength, MSG_DONTWAIT | MSG_NOSIGNAL); } while (nWrite == -1 && errno == EINTR); ... return OK; }
会直接调用send()函数向fd表示的socket中写入数据,同时在另一边的epoll_wait()调用就会因socket另一端fd数据的到来而唤醒,并通过fd找到注册好的request,进而调用request中的NativeInputEventReceiver的handleEvent()方法,参数就是我们接收到的事件信息与数据。
handleEvent 1 2 3 4 5 6 7 8 9 10 11 int NativeInputEventReceiver::handleEvent (int receiveFd, int events, void * data) ... if (events & ALOOPER_EVENT_INPUT) { JNIEnv* env = AndroidRuntime::getJNIEnv(); status_t status = consumeEvents(env, false , -1 , NULL ); mMessageQueue->raiseAndClearException(env, "handleReceiveCallback" ); return status == OK || status == NO_MEMORY ? 1 : 0 ; } ... return 1 ; }
调用了consumeEvents()函数来处理事件,函数较长,我们拆开来看:
函数进行初始化过程之后执行了一个无限循环,循环体中的内容如下:
1 2 3 InputEvent* inputEvent; status_t status = mInputConsumer.consume(&mInputEventFactory, consumeBatches, frameTime, &seq, &inputEvent);
首先就调用了mInputConsumer对象的consume方法接收并将原始的事件转换为分发过程中标准的MotionEvent:
1 status_t result = mChannel->receiveMessage(&mMsg);
这里就直接调用了InputChannel的receiveMessage()函数来接收另一端发送来的消息。
1 2 3 4 5 6 7 status_t InputChannel::receiveMessage (InputMessage* msg) ssize_t nRead; do { nRead = ::recv(mFd, msg, sizeof (InputMessage), MSG_DONTWAIT); } while (nRead == -1 && errno == EINTR); ... }
从socket另一端的fd中读取发送过来的触摸事件消息并存放在了mMsg中,之后进行处理:
1 2 3 4 5 6 7 8 9 10 11 12 13 14 15 16 17 18 19 20 21 22 switch (mMsg.header.type) { case InputMessage::TYPE_KEY: { ... } case AINPUT_EVENT_TYPE_MOTION: { ... MotionEvent* motionEvent = factory->createMotionEvent(); if (! motionEvent) return NO_MEMORY; updateTouchState(&mMsg); initializeMotionEvent(motionEvent, &mMsg); *outSeq = mMsg.body.motion.seq; *outEvent = motionEvent; #if DEBUG_TRANSPORT_ACTIONS ALOGD("channel '%s' consumer ~ consumed motion event, seq=%u" , mChannel->getName().string (), *outSeq); #endif break ; } }
这里对事件的类型进行了一个判断,当类型为MOTION即触摸事件时,新建了一个MotionEvent,然后用mMsg去进行初始化:
1 2 3 4 5 6 7 8 9 10 11 12 13 14 15 16 17 18 19 20 21 22 23 24 25 26 27 28 void InputConsumer::initializeMotionEvent (MotionEvent* event, const InputMessage* msg) uint32_t pointerCount = msg->body.motion.pointerCount; PointerProperties pointerProperties[pointerCount]; PointerCoords pointerCoords[pointerCount]; for (uint32_t i = 0 ; i < pointerCount; i++) { pointerProperties[i].copyFrom(msg->body.motion.pointers[i].properties); pointerCoords[i].copyFrom(msg->body.motion.pointers[i].coords); } event->initialize( msg->body.motion.deviceId, msg->body.motion.source, msg->body.motion.action, msg->body.motion.actionButton, msg->body.motion.flags, msg->body.motion.edgeFlags, msg->body.motion.metaState, msg->body.motion.buttonState, msg->body.motion.xOffset, msg->body.motion.yOffset, msg->body.motion.xPrecision, msg->body.motion.yPrecision, msg->body.motion.downTime, msg->body.motion.eventTime, pointerCount, pointerProperties, pointerCoords); }
然后在第14行把它存入了outEvent(也就是consume()函数中传入的inputEvent)中,现在函数返回到NativeInputEventReceiver::consumeEvents()继续处理:
1 2 3 4 5 6 7 8 9 10 11 12 13 14 15 16 17 18 19 20 21 22 23 24 25 26 switch (inputEvent->getType()) { case AINPUT_EVENT_TYPE_KEY: ... case AINPUT_EVENT_TYPE_MOTION: { if (kDebugDispatchCycle) { ALOGD("channel '%s' ~ Received motion event." , getInputChannelName()); } MotionEvent* motionEvent = static_cast <MotionEvent*>(inputEvent); if ((motionEvent->getAction() & AMOTION_EVENT_ACTION_MOVE) && outConsumedBatch) { *outConsumedBatch = true ; } inputEventObj = android_view_MotionEvent_obtainAsCopy(env, motionEvent); break ; } ... } if (inputEventObj) { if (kDebugDispatchCycle) { ALOGD("channel '%s' ~ Dispatching input event." , getInputChannelName()); } env->CallVoidMethod(receiverObj.get(), gInputEventReceiverClassInfo.dispatchInputEvent, seq, inputEventObj); ... }
下面就对inputEvent(即为MotionEvent)的类型作了一个判断,对inputEventObj(用于调用java层方法)进行赋值。随后就通过JNI 的CallVoidMethod()方法来调用java层的dispatchInputEvent()方法。这里调用的是java层InputEventReceiver的dispatchInputEvent()方法:
从这里,我们从Native层跨越到了java层。
开始分发 1 2 3 4 private void dispatchInputEvent (int seq, InputEvent event) mSeqMap.put(event.getSequenceNumber(), seq); onInputEvent(event); }
InputEventReceiver是一个抽象类,具体实现类是ViewRootImpl的内部类WindowInputEventReceiver,它覆盖了onInputEvent()方法:
1 2 3 4 @Override public void onInputEvent (InputEvent event) enqueueInputEvent(event, this , 0 , true ); }
调用了ViewRootImpl的enqueueInputEvent()方法:
1 2 3 4 5 6 7 8 9 10 11 12 13 14 15 16 17 18 19 20 21 22 23 24 25 26 27 28 void enqueueInputEvent (InputEvent event, InputEventReceiver receiver, int flags, boolean processImmediately) adjustInputEventForCompatibility(event); QueuedInputEvent q = obtainQueuedInputEvent(event, receiver, flags); QueuedInputEvent last = mPendingInputEventTail; if (last == null ) { mPendingInputEventHead = q; mPendingInputEventTail = q; } else { last.mNext = q; mPendingInputEventTail = q; } mPendingInputEventCount += 1 ; Trace.traceCounter(Trace.TRACE_TAG_INPUT, mPendingInputEventQueueLengthCounterName, mPendingInputEventCount); if (processImmediately) { doProcessInputEvents(); } else { scheduleProcessInputEvents(); } }
将接收到的事件加入了mPendingInutEvent链表的头部,注释里给出了这么做的原因:当发生事件插入的时候我们不能依赖事件的时间戳是准确的,因此必须让最新收到的事件先进行处理。
最终调用doProcessInputEvents()进行事件处理:
1
2
3
4
5
6
7
8
9
10
11
12
13
14
15
16
17
18
19
20
21
22
23
24
25
26
27
28
void doProcessInputEvents () while (mPendingInputEventHead != null ) { QueuedInputEvent q = mPendingInputEventHead; mPendingInputEventHead = q.mNext; if (mPendingInputEventHead == null ) { mPendingInputEventTail = null ; } q.mNext = null ; mPendingInputEventCount -= 1 ; Trace.traceCounter(Trace.TRACE_TAG_INPUT, mPendingInputEventQueueLengthCounterName, mPendingInputEventCount); long eventTime = q.mEvent.getEventTimeNano(); long oldestEventTime = eventTime; if (q.mEvent instanceof MotionEvent) { MotionEvent me = (MotionEvent)q.mEvent; if (me.getHistorySize() > 0 ) { oldestEventTime = me.getHistoricalEventTimeNano(0 ); } } mChoreographer.mFrameInfo.updateInputEventTime(eventTime, oldestEventTime); deliverInputEvent(q); } ... }
在从链表中取出事件之后,对事件的时间戳进行了更新。然后调用deliverInputEvent()方法:
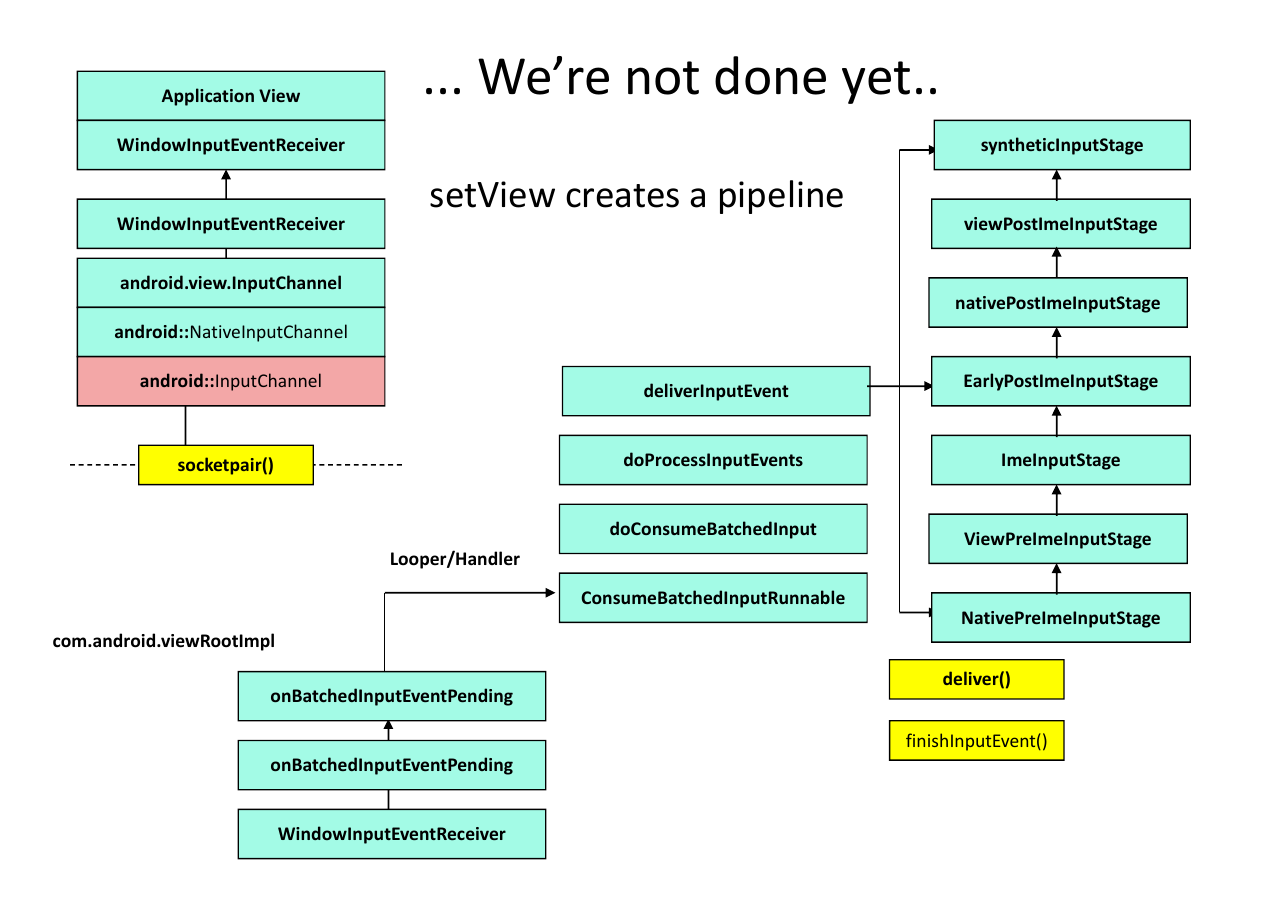
1 2 3 4 5 6 7 8 9 10 11 12 13 14 15 16 17 18 19 private void deliverInputEvent (QueuedInputEvent q) Trace.asyncTraceBegin(Trace.TRACE_TAG_VIEW, "deliverInputEvent" , q.mEvent.getSequenceNumber()); if (mInputEventConsistencyVerifier != null ) { mInputEventConsistencyVerifier.onInputEvent(q.mEvent, 0 ); } InputStage stage; if (q.shouldSendToSynthesizer()) { stage = mSyntheticInputStage; } else { stage = q.shouldSkipIme() ? mFirstPostImeInputStage : mFirstInputStage; } if (stage != null ) { stage.deliver(q); } else { finishInputEvent(q); } }
这段代码第一眼看上去比较难懂,Stage让我们联想到了CPU流水线处理过程中的Stage,这里就是进入了一个流水线过程来处理事件:
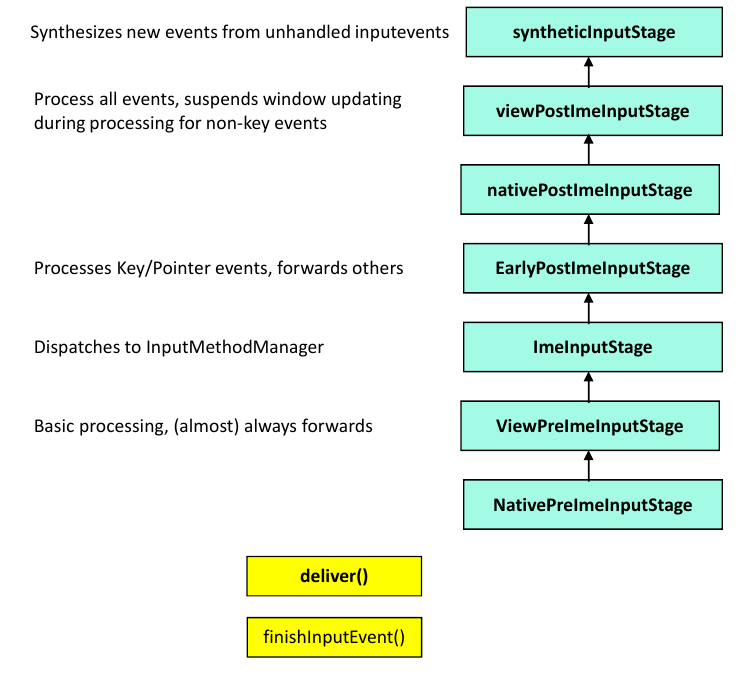
流水线事件处理
首先看到我们可以根据事件类型的需要从mSyntheticInputStage EarlyPostImeInputStage NativePreImeInputStage三个入口进入流水线,而流水线的每一步都对事件进行了不同的处理,并可以通过forward()方法传递到下一个Stage进行处理。并且这里使用的流水线是一个异步流水线,可以允许多个事件同时在里面运行处理,这种架构使得事件处理流程效率非常高。
那么我们的触摸事件从NativePreImeInputStage进入流水线后会经历什么处理过程呢:
我们并不是IME的事件,所以直接从EarlyPostImeInputStage开始:
EarlyPostImeInputStage 1 2 3 4 5 6 7 8 9 10 11 12 @Override protected int onProcess (QueuedInputEvent q) if (q.mEvent instanceof KeyEvent) { return processKeyEvent(q); } else { final int source = q.mEvent.getSource(); if ((source & InputDevice.SOURCE_CLASS_POINTER) != 0 ) { return processPointerEvent(q); } } return FORWARD; }
第7行判断成立,进入processPointerEvent():
1 2 3 4 5 6 7 8 9 10 11 12 13 14 15 16 17 18 19 20 21 22 23 24 25 26 27 private int processPointerEvent (QueuedInputEvent q) final MotionEvent event = (MotionEvent)q.mEvent; if (mTranslator != null ) { mTranslator.translateEventInScreenToAppWindow(event); } final int action = event.getAction(); if (action == MotionEvent.ACTION_DOWN || action == MotionEvent.ACTION_SCROLL) { ensureTouchMode(true ); } if (mCurScrollY != 0 ) { event.offsetLocation(0 , mCurScrollY); } if (event.isTouchEvent()) { mLastTouchPoint.x = event.getRawX(); mLastTouchPoint.y = event.getRawY(); mLastTouchSource = event.getSource(); } return FORWARD; }
对事件进行处理以后继续进入下一阶段。
NativePostImeInputStage 1 2 3 4 5 6 7 8 @Override protected int onProcess (QueuedInputEvent q) if (mInputQueue != null ) { mInputQueue.sendInputEvent(q.mEvent, q, false , this ); return DEFER; } return FORWARD; }
如果有事件等待被处理,则推迟当前事件的处理(实现异步)。否则直接进入下一个阶段:
ViewPostImeInputStage 1 2 3 4 5 6 7 8 9 10 11 12 13 14 15 @Override protected int onProcess (QueuedInputEvent q) if (q.mEvent instanceof KeyEvent) { return processKeyEvent(q); } else { final int source = q.mEvent.getSource(); if ((source & InputDevice.SOURCE_CLASS_POINTER) != 0 ) { return processPointerEvent(q); } else if ((source & InputDevice.SOURCE_CLASS_TRACKBALL) != 0 ) { return processTrackballEvent(q); } else { return processGenericMotionEvent(q); } } }
第7行判断成立,调用processPointerEvent()方法:
1 2 3 4 5 6 7 8 9 10 11 12 private int processPointerEvent (QueuedInputEvent q) final MotionEvent event = (MotionEvent)q.mEvent; mAttachInfo.mUnbufferedDispatchRequested = false ; final View eventTarget = (event.isFromSource(InputDevice.SOURCE_MOUSE) && mCapturingView != null ) ? mCapturingView : mView; mAttachInfo.mHandlingPointerEvent = true ; boolean handled = eventTarget.dispatchPointerEvent(event); ... return handled ? FINISH_HANDLED : FORWARD; }
判断目标是否是mCapturingView,一般情况下目标就是mView(也就是当前Window的根View也就是DecorView),然后调用了它的dispatchPointerEvent()方法(继承自View):
1 2 3 4 5 6 7 public final boolean dispatchPointerEvent (MotionEvent event) if (event.isTouchEvent()) { return dispatchTouchEvent(event); } else { return dispatchGenericMotionEvent(event); } }
到这里,我们终于看到了熟悉的dispatchTouchEvent()方法,同时这也是一般触摸事件分发机制分析的开始。
小结 现在,我们了解了从原始事件的产生地点到某个应用UI线程事件循环再到根view的dispatchTouchEvent()的整个流程。分析这个过程还是要再次感谢Gityuan的博客 ,这个过程找得到的资料只有他的文章,省了许多功夫。
下一篇文章开始就要讲解一般触摸事件分发分析的过程,也是参考资料比较多的部分。