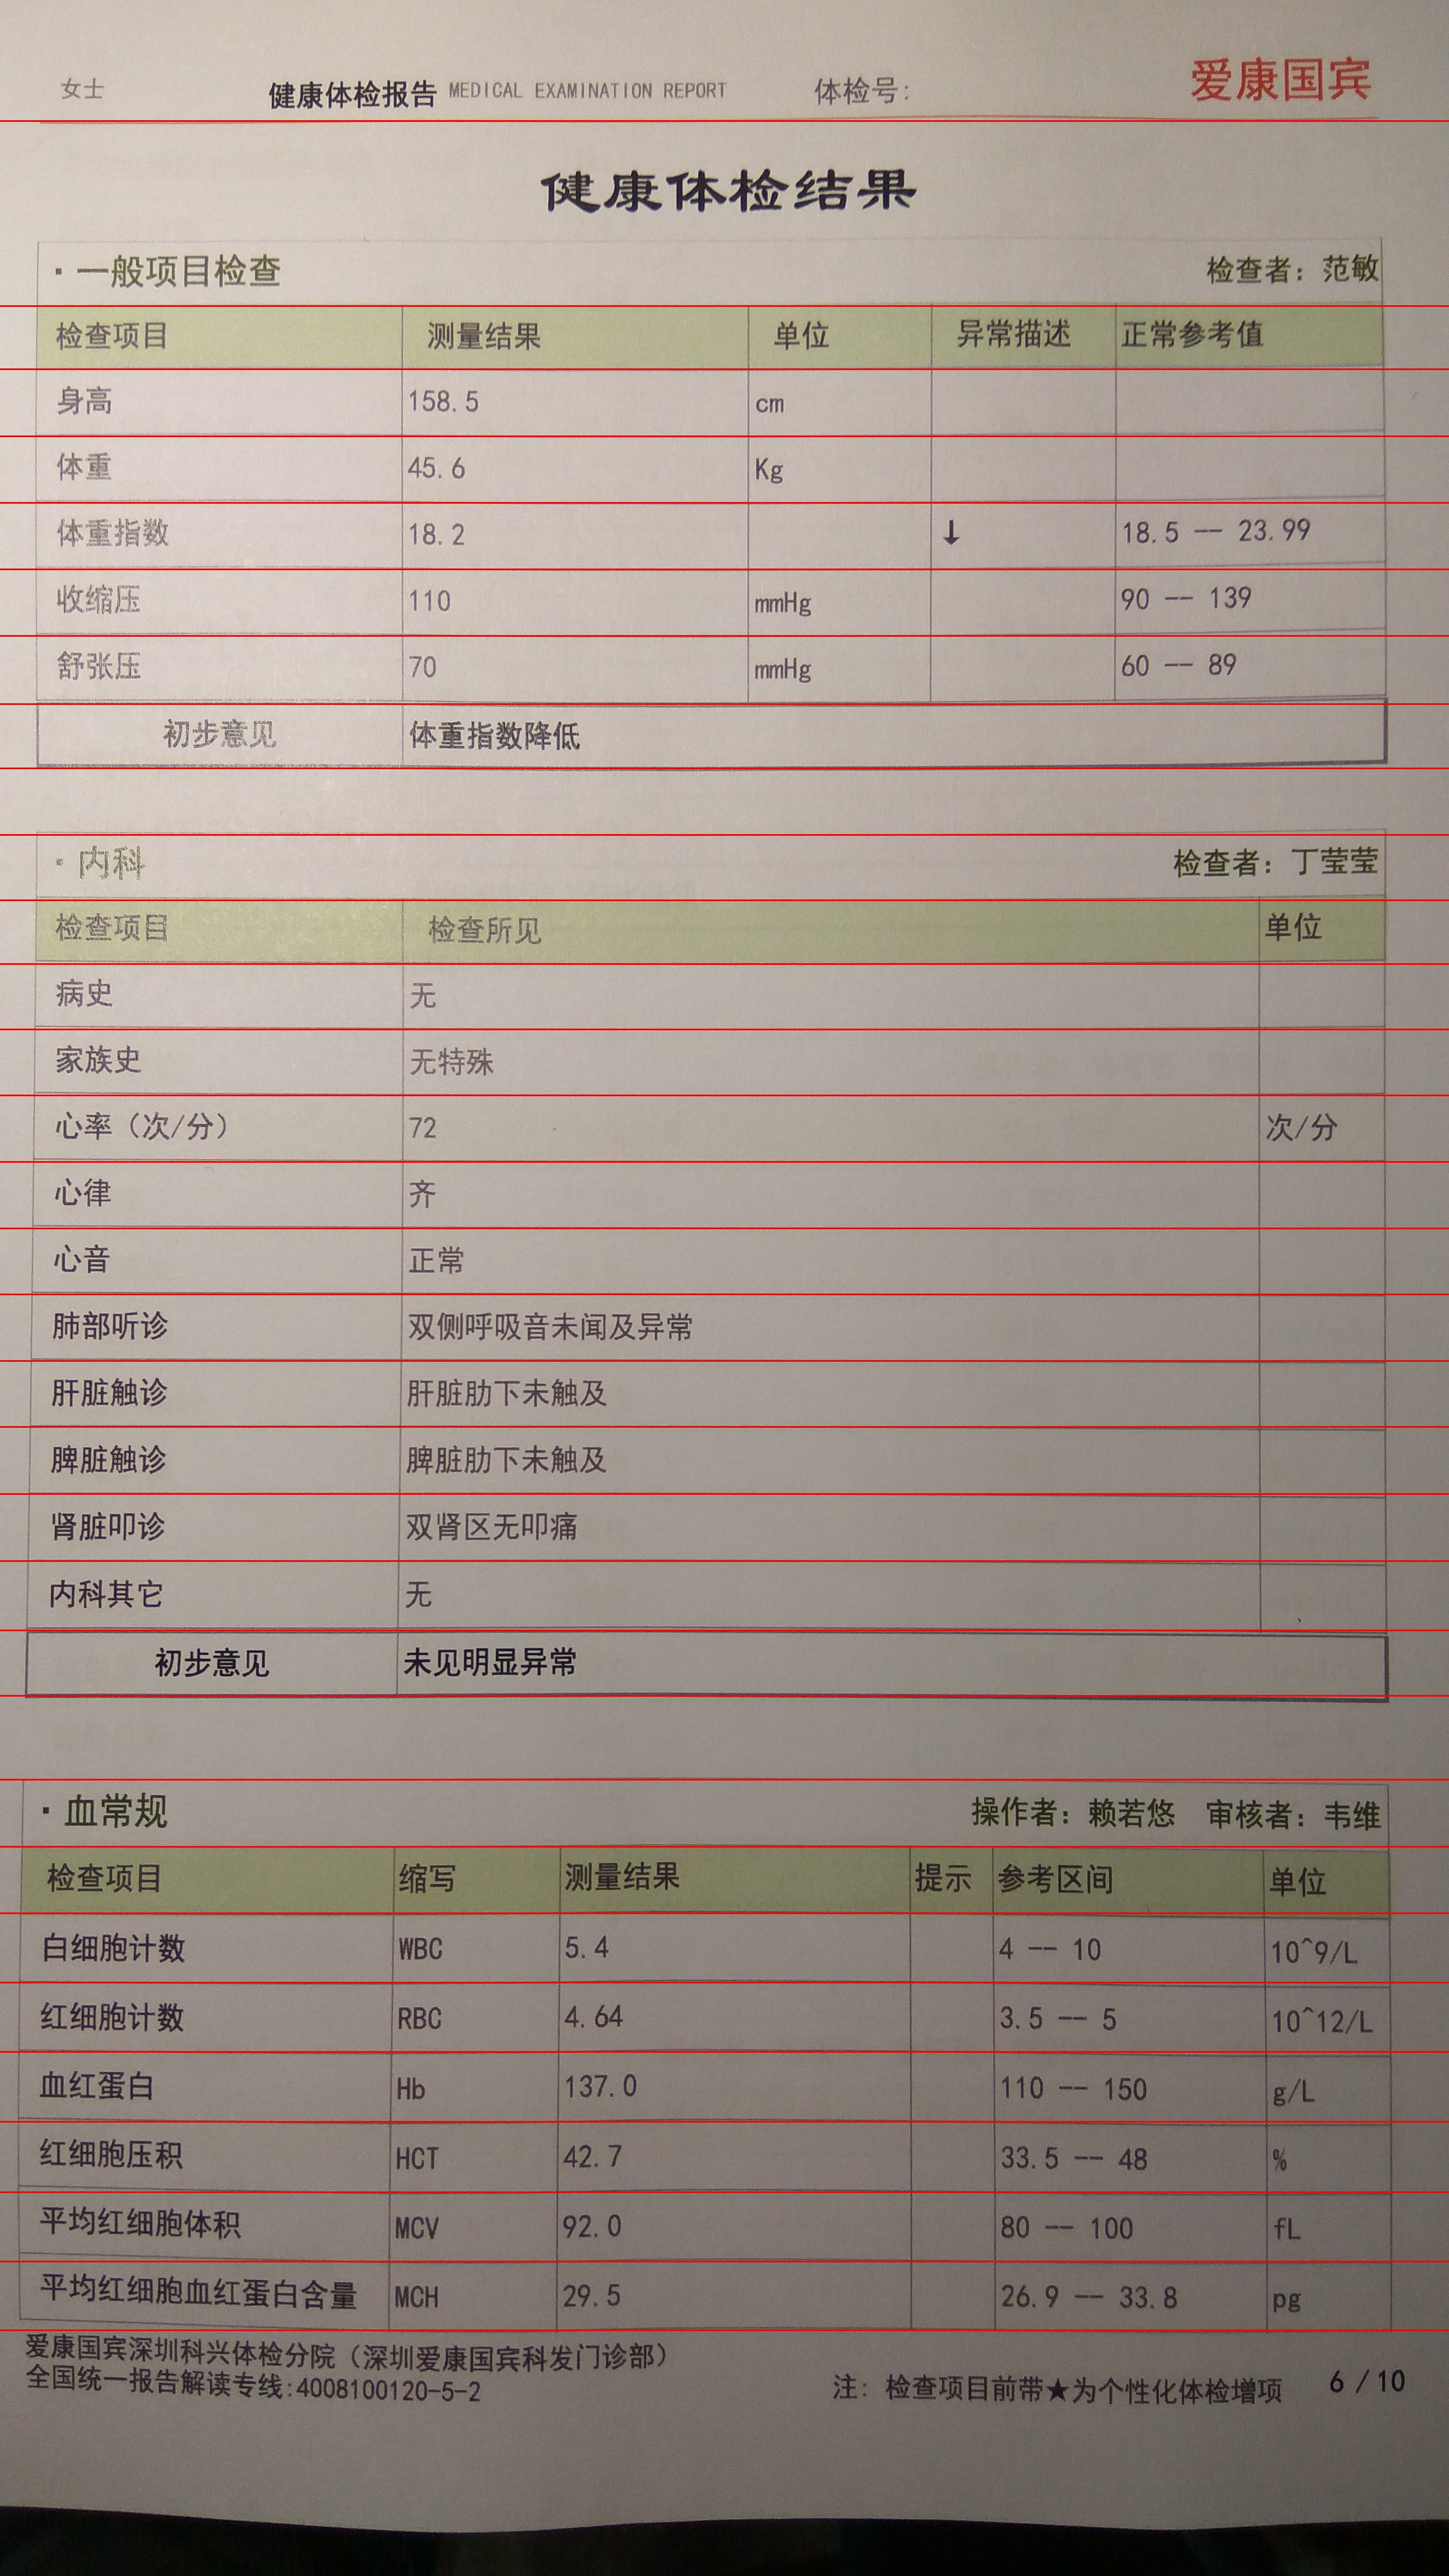
OpenCV处理拍照表格(三)

说明

在开始说明直线检测过程前先作个说明,由于直线检测的算法需要遍历每个像素,所以总的耗时比较长,在安卓上跑的时候直线检测的时间可能会长达两分钟,这是在测试过程中不能接受的,所以我将安卓上的代码整个迁移到了Idea中,关于Idea中OpenCV的配置,可以参见这个教程

这个步骤的目的:这步中我们会检测出整张图片中满足条件的所有直线,再通过筛选选出横的表格框线,再利用检测出的表格框线来提取两个框线之间的内容即为表格中的一行。

代码实现

1
2
3
4
5
6
7
8
9
10
11
12
13
14
15
16
17
18
19
20
21
22
23
24
25
26
private void cutImagesToRows() {
ArrayList<Double> lineYs = new ArrayList<>();
ArrayList<Double> uniqueLineYs = new ArrayList<>();

//lines:a special mat for find lines
Mat lines = new Mat();
//find lines and store in lines
Imgproc.HoughLinesP(dilateMuchPic, lines, 1, Math.PI / 180, Y_THRESHOLD,
Y_MINLINELENGTH, Y_MAXLINEGAP);

//get the lines information from lines and store in lineYs
for (int i = 0; i < lines.rows(); i++) {
double[] points = lines.get(i, 0);
double y1, y2;

//just need the horizontal lines
y1 = points[1];
y2 = points[3];

// if it slopes, get the average of them, store the y-coordinate
if (Math.abs(y1 - y2) < 30) {
lineYs.add((y1 + y2) / 2);
}
}
getUniqueLines(lineYs, uniqueLineYs, 10);

上面的注释里面讲得比较清楚,另外有一些解释:

  • 前面提到过HoughLinesP这个函数的第二个参数是一个特殊的Mat,也就是代码中的lines,它的col(列)的值为1,row(行)的值为检测出的所有直线 (这里要注意一下,我手上的书的这两个值正好相反,可能是标准不同,我这里用的是OpenCV 3.1。每个row为一个double[4],四个值分别对应着起始点的x,y坐标,终点的x,y坐标(图片的左上角为原点)。两个点连起来就是检测出的直线。可以看到这里我只取了1,3,对应的是起点和终点的y坐标。

  • if (Math.abs(y1 - y2) < 30)这句判断的目的是过滤掉竖直的直线(起始点y坐标之差显然大于30),并且允许横线有一定的倾斜(起始点可以有30像素的差距)。找到这样的一对点后,把它们的y坐标取平均值存入一个数组中。

由于图片中一条直线的宽度不可能正好是一个像素,所以必然会出现一条直线检测出很多个y坐标的问题,下面这个方法就是为了找到这些多余的y坐标并取它们的平均值作为最终的y坐标。

getUniqueLines(lineYs, uniqueLineYs, 10);代码如下:

1
2
3
4
5
6
7
8
9
10
11
12
13
14
15
16
17
18
19
20
21
22
23
24
25
/**
* filter the source coordinates, if some values are too close ,get the average of them
*
* @param src source coordinates list
* @param dst destination coordinate list
* @param minGap the minimum gap between coordinates
*/
private void getUniqueLines(ArrayList<Double> src, ArrayList<Double> dst, int minGap) {
Collections.sort(src); //sort the source coordinates list
for (int i = 0; i < src.size(); i++) {
double sum = src.get(i);
double num = 1;
//when the distance between lines less than minGap, get the average of thema
while (i != src.size() - 1 && src.get(i + 1) - src.get(i) < minGap) {
num++;
sum = sum + src.get(i + 1);
i++;
}
if (num == 1) {
dst.add(src.get(i));
} else {
dst.add(((sum / num)));
}
}
}

minGap:直线间距阈值,间距小于这个值的直线被处理。

1
2
3
4
5
6
7
8
9
10
11
12
13
14
15
16
17
18
19
20
blockImages = new ArrayList<>();
for (int i = 0; i < uniqueLineYs.size(); i++) {
Rect rect;
double y = uniqueLineYs.get(i);
//if not the last line
if (i != uniqueLineYs.size() - 1) {
rect = new Rect((int) (srcPic.width() * PADDING_LEFT_RIGHT),
(int) (y + (uniqueLineYs.get(i + 1) - y) * PADDING_TOP_BOTTOM),
(int) (srcPic.width() * (1 - PADDING_LEFT_RIGHT * 2)),
(int) ((uniqueLineYs.get(i + 1) - y) * (1 - PADDING_TOP_BOTTOM * 2)));
} else {
//the last line
rect = new Rect((int) (srcPic.width() * PADDING_LEFT_RIGHT),
(int) (y + (srcPic.height() - y) * PADDING_TOP_BOTTOM),
(int) (srcPic.width() * (1 - PADDING_LEFT_RIGHT * 2)),
(int) ((srcPic.height() - y) * (1 - PADDING_TOP_BOTTOM * 2)));
}
//cut the source picture to cutMat
Mat cutMat = new Mat(srcPic, rect);
blockImages.add(cutMat);

这步就是切割了,blockImages就是存放切割后的行图像的ArrayList

关于RectRect对象表示一个区域,可以作为Mat的构造参数传入来为目标区域创造一个Mat副本。四个参数分别代表了区域起始点的x,y坐标,区域长度和区域高度。

可以看到这里我使用了一个PADDING参数,来规定切割时距规定边缘的距离来避免把一些表格的边线切到图像中影响OCR的识别。

至于上面一篇博客中最后的红线是测试时用

1
2
3
4
5
6
7
8
9
10
11
12
13
private void showMarkedLines(Mat src, ArrayList<Double> lines) {
Mat showLines = new Mat();
Imgproc.cvtColor(src, showLines, COLOR_GRAY2BGR);
for (double y : lines) {

Point pt1 = new Point(0, y);
Point pt2 = new Point(src.width(), y);
Imgproc.line(showLines, pt1, pt2, new Scalar(0, 0, 255), 3);
}
Imgcodecs.imwrite("C:/Users/visea/Desktop/test/java/cut/" +
String.valueOf(colNum) +
".jpg", showLines);
}

打印出来的,这里新建了一个showLines并且把原图像通过Imgproc.cvtColor方法转换成BGR图像并复制到showLines(不转化成彩色格式只能显示灰度图像)。

打印一条直线也比较简单,只要新建两个Point对象代表起始点和终点,这里我把x坐标设置为图像的起始x坐标,y坐标为之前得到的唯一的y值,所以可以看到画出来的线就是水平并且从开头一直到结束的。

画直线使用Imgproc.line方法,最后两个参数依次是BGR三个通道的值组成的Scalar对象,代表直线的颜色,以及画出的直线的宽度(以像素为单位)。

效果

最后用Imgcodecs.imwriteMat写入文件就可以看到最终的效果了,在测试的时候尤其有用。

redlines1

也可以把blockImages中的图输出出来看结果,因为做的时候没存档,所以只能用之后的图来说明一下了:

请忽略图中的红线,为之后的步骤绘制出来的,左右不完整是因为我设置了百分之二十的左右的PADDING,为了方便后面的找线与切割。

当然在找直线的过程中也可以把找到的图片打印出来感觉一下效果,下面分别是调试前出的图和最终参数调试后出来的图:

调试前:

调试后: